How to Create Sales Pipeline and Custom Deal Stages in HubSpot?
The sales pipeline in HubSpot helps you to visualize your sales process in order to predict the expected revenues and trends and also to predict roadblocks in your selling process. The multiple steps involved in designing the pipeline that reflects the movement of an opportunity to the point of closing are called deal stages.
Note: To create and edit the deal pipeline and stages, you must have access to the Edit property settings and the admin permissions to the HubSpot account.
1. How to Create a Pipeline in HubSpot?
Note: There is a different limit for each subscription pack to create a sales pipeline in HubSpot.
- Go to the Settings icon in tha main navigation bar of your HubSpot account.
- Navigate to Objects > Deals.
- Click the Pipelines tab.
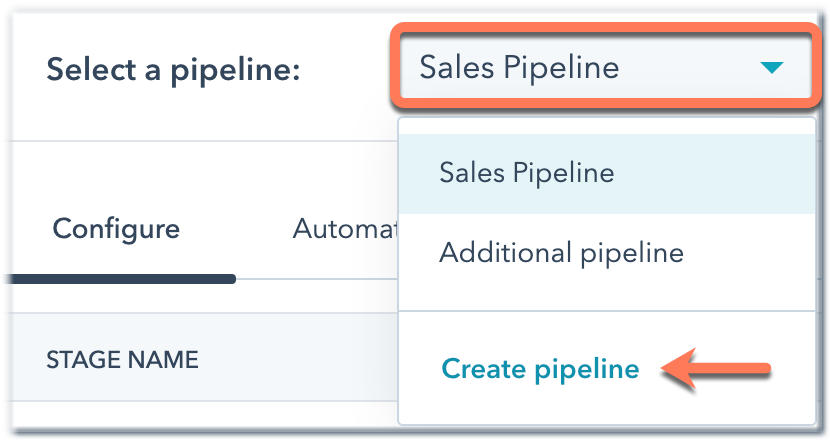
- Click the Select a pipeline dropdown menu, then select Create pipeline.

- Enter a Pipeline name and click Create.
Your Sales pipeline is successfully created in HubSpot CRM.
2. How to Edit or Delete Deal Pipelines?
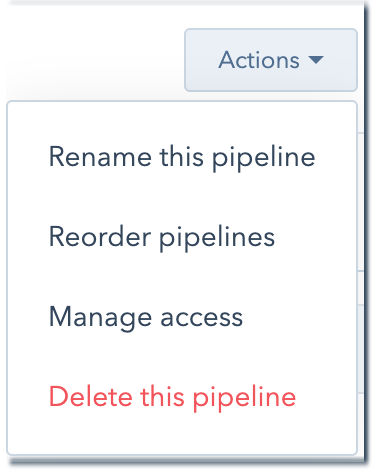
You can perform multiple actions with deal pipelines in HubSpot like rename, reorder, manage access, and delete pipelines.
Note: A new pipeline will automatically be created and added to your HubSpot account if you connect your account with any eCommerce integration. Also, you have no permission to edit or delete this pipeline.
- Click the settings icon in the main navigation bar of your HubSpot account.
- Go to Objects > Deals.
- Click the Pipelines tab.
- Click the Select a pipeline dropdown menu to select a pipeline.
- Click the Actions dropdown menu on the right and select one of the following:

Perform the desired action in the pipeline and save your settings.
3. Edit Deal Stages and Deal Stage Properties
You can use deal stages to categorize and track the progress of your ongoing deals in HubSpot. Each deal stage has an associated probability that indicates the likelihood of closing deals marked with that deal stage.
By default, HubSpot includes a sales pipeline with seven deal stages:
- Appointment scheduled (20%)
- Qualified to buy (40%)
- Presentation scheduled (60%)
- Decision makers bought in (80%)
- Contract sent (90%)
- Closed won (100% Won)
- Closed lost (0% Lost)
To edit or customize the deal stages in a sales pipeline, follow the steps below:
- Select the pipeline you want to edit following the steps mentioned above.
- To add a new deal stage:
- Under the existing deal stages, select + Add a deal stage.
- Enter a deal stage name, then go to the dropdown menu in the Deal probability column and select or enter a probability.
- To reorder stages, click the stage and drag it to a new position.
- To view the internal name for a deal stage, hover over the stage and click the code icon. The internal name is used by integrations and the API.
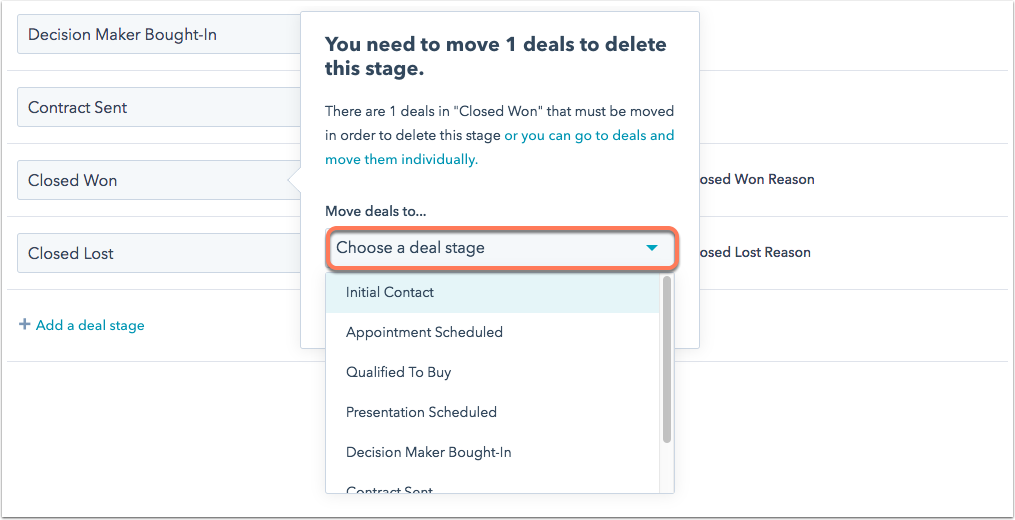
- To delete a stage, hover over a stage and click Delete. If there are deals in the stage you’re deleting, you’ll be prompted to move these existing deals to another stage.
- Click the Choose a deal stage dropdown menu to select the new deal stage the deals should be moved to.
- Click Move deals and delete stage to confirm.

- To customize the deal properties presented to users when a deal moves to a specific stage:
- In the row of the stage, hover over the Update stage properties column and click Edit properties.
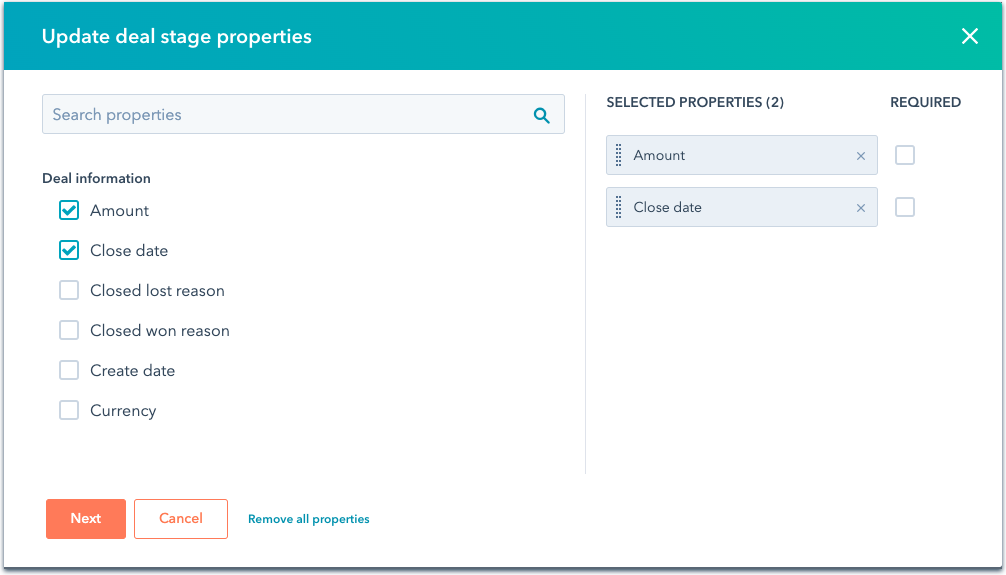
- In the dialog box, select the checkboxes next to any new properties you want to appear.
- To require a value for a property, select the checkbox in the Required column (Sales Hub Professional or Enterprise only).
- To reorder the properties, click and drag them to a new position.
- To remove a selected property, click the X next to that property in the Selected Properties column.
- Once you’ve selected your properties, click Next.

- Once you’re done editing, click Save in the bottom left.
You can also automate tasks on deal stages when editing or creating a sales pipeline.

