How to Create & Customize HubSpot Contact Views?
With HubSpot CRM, you can not only filter the saved views and consider the records of the objects(contacts, deals, companies, and tickets). But, can also create new views and customize the saved views in accordance with your business goals and requirements.
To have the exact information from your synced objects, you can apply filters to each record and its properties. The set of filters applied can be saved as a view. This implies that whenever you select any saved view, the same set of filters will be applied to derive the information from the objects meeting those standards.
1. How to Create a New Saved Filter View in HubSpot?
To filter contacts in HubSpot and/or create a saved view in HubSpot to filter marketing contacts or any specific company contacts, etc., follow the steps below:
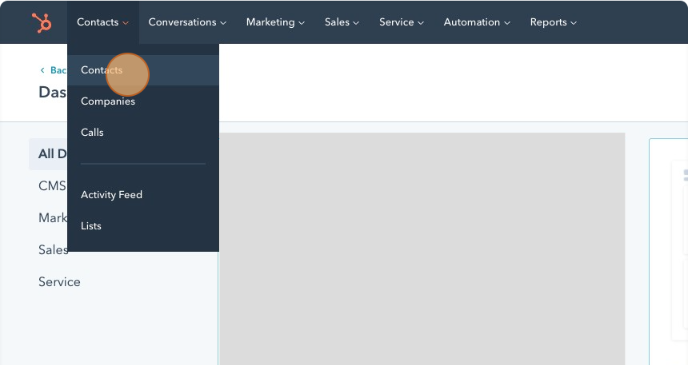
- Login to your HubSpot account and navigate to “Contacts” in the menu.
(Note: we’re taking Contacts here to illustrate the process. You can follow the same with Companies, deals, and tickets)
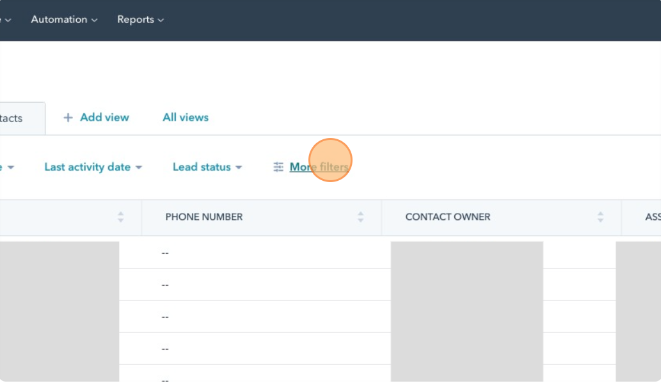
- Select “More Filters”
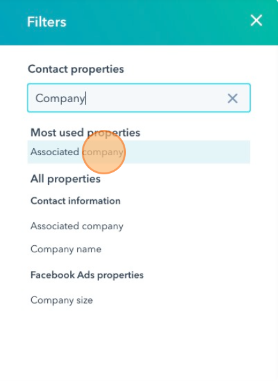
- Now, you can search for any property you want to filter in this step. In this example, we’ll create a saved filter view to search for contacts from a specific company. Therefore, search and click on “Associated Company”.
- After selecting the filter property, select the company by clicking on “Search Companies”.
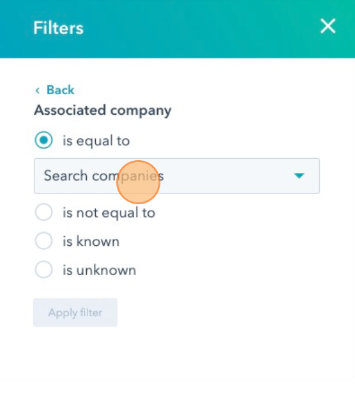
- Search and select the “Company Name”. Then click on “Apply Filter” and Close the property window once done.
- Now, when you’re back onto your Contacts screen, select “Saved View”.
- Go to “Save as new”. Type in the Filter name and set the access permissions to “Private”, “My Team”, or “Everyone”. Finally, click on “Save” to save your changes.
- Your Saved View is created successfully.
2. How to Pin a Saved View in HubSpot?
If you want your view to always be accessible in a tab, you need to pin it. To pin your Saved View:

- Go to contacts, companies, deals, or tickets, in your HubSpot account.
- For your deals or tickets home, make sure it’s in the table format.
- Click Add view and select the view that you want to pin.
- In the view, again click the tab and select Pin view to keep open.
- Once the view is pinned, you can make the saved view the default view by clicking the tab and selecting the Make default view.
3. How to Customize a HubSpot View Properties and Board Cards?
To customize how properties appear in a table or board view:
In the Table format:
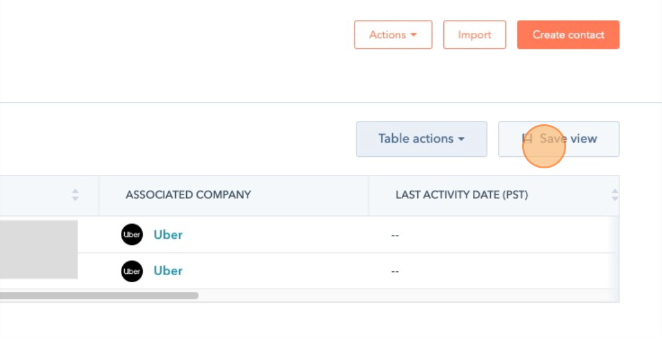
- Click the Table Actions dropdown menu
- Select Edit columns. A dialog box will appear:
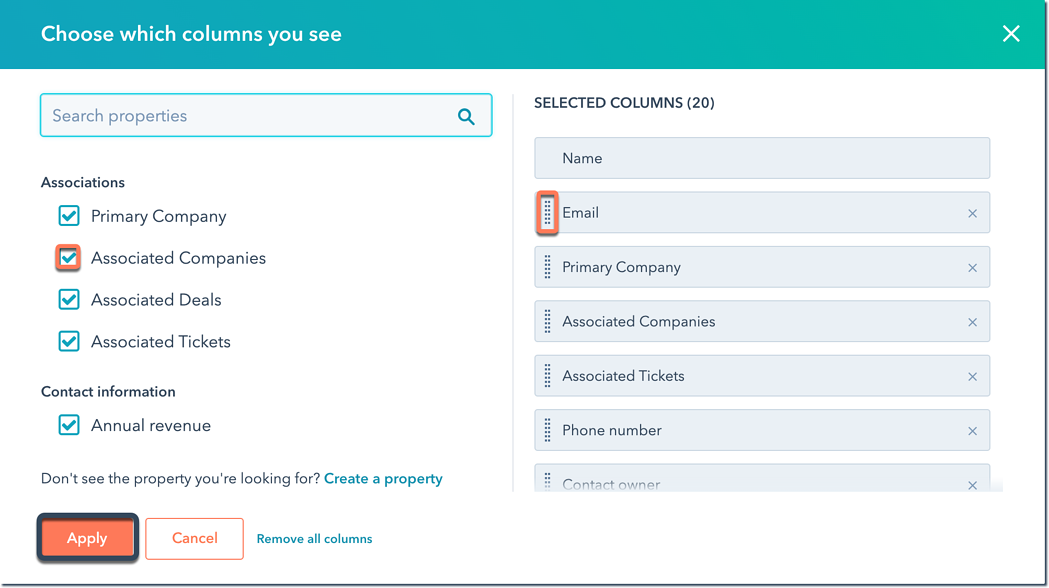
- Select the properties, on the left that you wish to appear in the table.
- Now, on the right, drag and drop properties to reorder the columns.
- Click “Apply” to save the changes.
In the Board format:
- Select “Edit Stages” to edit the stages in your pipeline.
- Select “Edit cards” to organize the layout of the card.
- Choose the card style to customize the amount of information shown in each object card (Default or Compact).
- Select or deselect the checkbox to choose whether or not icons will appear for associated records.
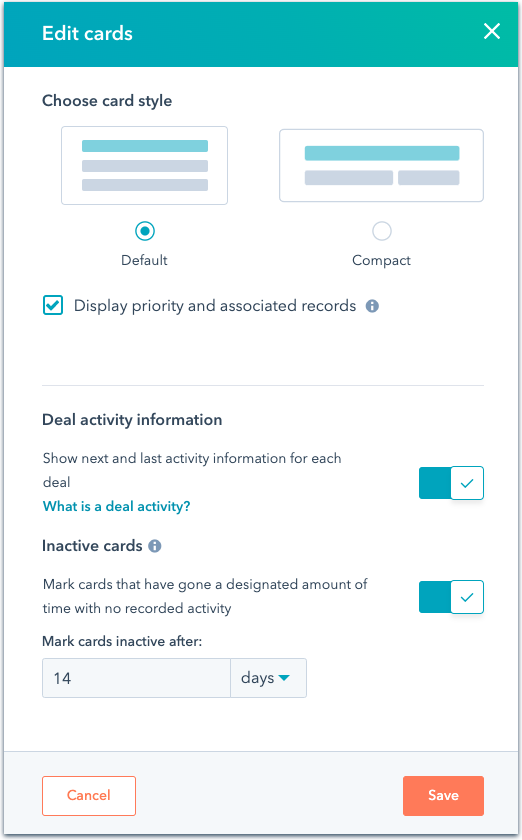
- Toggle the “Deal activity information” and “Inactive cards” switch.
- Once done, click on “Save”.
4. How to Manage Views in HubSpot?
To manage Views in HubSpot:
- Go to contacts, companies, deals, or tickets, in your HubSpot account.
- For the deals or tickets, make sure it’s in the table format. If you’re in the board format, click the table icon in the upper left.
- Click All views and you can see all your saved views
- To edit any existing view, hover over the view and click the drop-down from Options to perform any of the following view options:
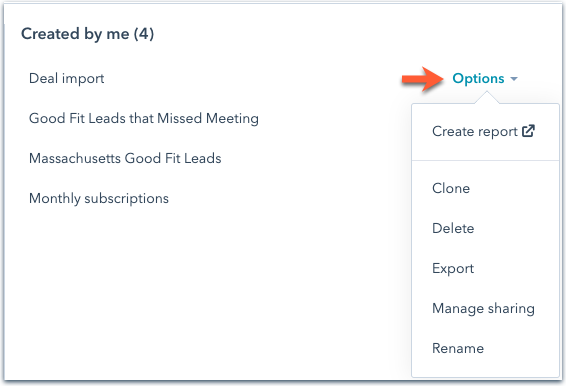
- Create report: select to create a custom single object report using filters.
- Clone: select to clone this view. In the new window, enter the clone view’s name and click Save.
- Delete: select to delete the view. In the new window, click Delete.
- Export: select to export the records in the view.
- In the new window, click the drop-down File format to select the format for your export file.
- Select either Include only properties in the columns or Include all properties.
- Click Export. An email with a link will be delivered to your email inbox once it is processed.
- Manage sharing: select to choose the users who can see your view.
- In the new window, select Private to keep the view private, My team to share it with your HubSpot team, or Everyone to share it with all users in the HubSpot account.
- Click Save.
- Rename: select to change the view’s name. In the new window, enter the new name and click Save.
