How to Use HubSpot Personalization Tokens?
HubSpot Personalization tokens allow you to show personalized content to your contacts based on their CRM property values. Personalization tokens in HubSpot can boost website and email campaign engagement. You can use any default or custom contact property to personalize content in HubSpot emails, website pages, and landing pages.
This article will show you how to insert personalized content into HubSpot rich text modules in the page editor, marketing email editor, and page and email templates. Please remember that personalization is not available for landing pages created with a starter template or any externally hosted pages.
Adding HubSpot Personalization To Your Content
1- Go to content
- Website Pages: Go to Marketing > Website > Website Pages in your HubSpot account.
- Landing Pages: Go to Marketing > Landing Pages in your HubSpot account.
- Email: Go to Marketing > Email in your HubSpot account.
Please Note: On a thank you page, you should not use smart content. When a visitor submits a form and is redirected to a thank you page, HubSpot does not have enough time to determine whether the contact satisfies the smart content rules on the thank you page.
2- Hover over the name of the content you want to edit and select Edit.
3- Click Create email/landing page/website page if you’re creating new content.Click a rich text module in the editor to insert a personalization token.
4- Place your cursor where you want the personalization token to appear, then select it from the Personalize dropdown menu in the rich text toolbar
5- Use the search bar to select a HubSpot token from the token dropdown menu.
The following HubSpot personalization tokens are available
- Company: The values for the company properties associated with your contacts in your HubSpot database are used for these tokens. This includes tokens for the owner of the company, total revenue, industry, and name.
- Contact: The values for any contact properties associated with your contacts in your HubSpot database are used for these tokens. This includes contact owner, first name, last name, and email tokens.
- Office Location: These tokens come from the email footer information in your settings. This includes city, state, and zip code tokens.
- Subscription type: The name of the email’s subscription type is used in this token.
Please Note:
HubSpot Personalization tokens for deals, tickets, quotes, and custom objects can only be used in marketing emails saved for automation by users with Edit access to workflows. The type of token must correspond to the type of automation. An example of HubSpot personalized tokens includes: you can send only emails with Deal personalization tokens from deal-based workflows.
6- To use as your token, choose a property from the dropdown menu. If you choose Contact owner or Company owner, use the User property dropdown menu to choose a property from the owner’s user profile as your token.
7- Set the token’s default value. When contact does not have a value for a specific property, the default value is used. You can also set global default token values.
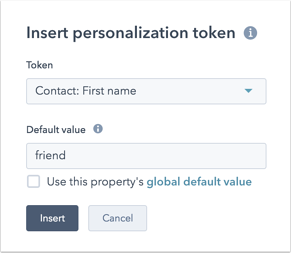
8- Click the Insert token button. In the rich text module, the token will be highlighted with the name of the selected property.
Preview Personalization tokens in HubSpot
- To see how personalization will look on your landing and website pages, click the Preview button in the upper right corner. Click the Choose a contact to preview the dropdown menu and select a contact to preview the page.
- To preview personalization in an email, click the Actions dropdown menu in the upper right corner and select Preview. To preview the email as a specific contact, select a contact from the Preview as a specific contact dropdown menu.
