How Can You Redirect a Page or Blog Post In HubSpot?
Using the URL redirection tool, you may redirect visitors from any URL on a HubSpot-hosted domain to any other URL. With flexible pattern redirection, you can also set up rules that dynamically adjust the structure of URLs.
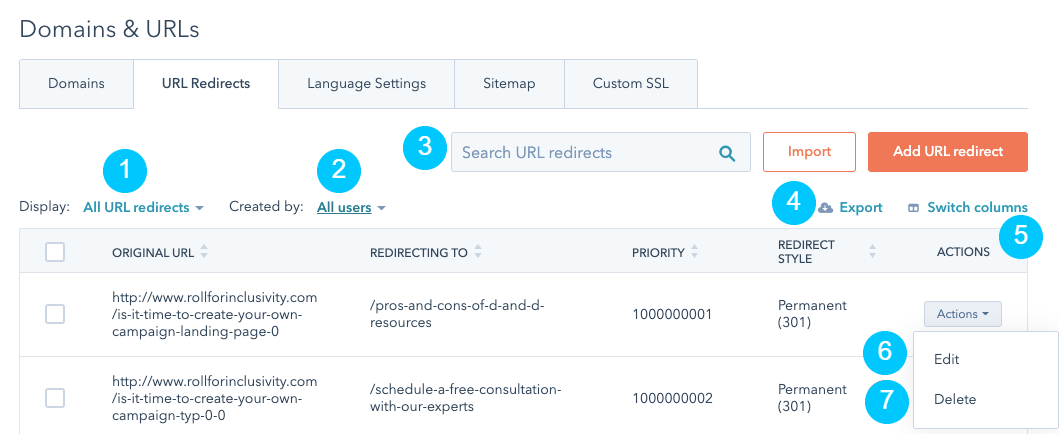
Create a new URL redirect.
- Go to the settings icon in the main navigation bar of your HubSpot account.
- Navigate to Website > Domains & URLs in the left sidebar menu.
- Navigate to the URL Redirects tab.
- Click Add URL redirect in the upper right corner.
- Select the Standard or Flexible reroute type in the right panel.
- To redirect one URL to another, a normal redirect is utilized.
- A flexible redirect modifies URLs based on their structure.
- Enter the URL path or full URL that you want to redirect in the Original URL area.
- Enter the URL of the page to which you wish the original URL to redirect in the original URL field.
Note: When redirecting to a non-HubSpot-hosted external website, enter the complete URL, including http:// or https:// (e.g., http://www.domain.com/name-of-page).
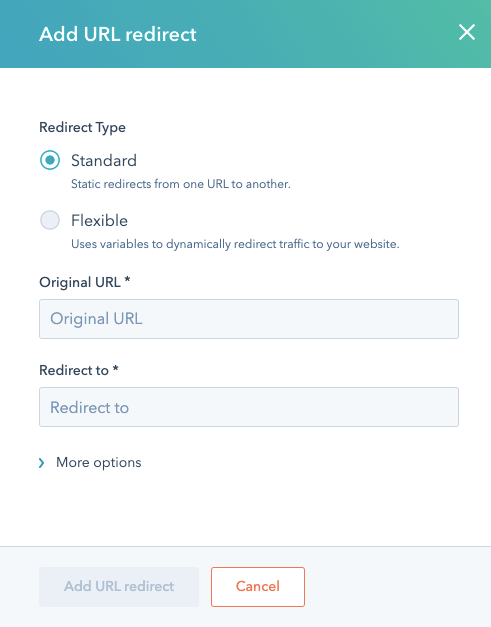
Customize the URL Redirects Using Advanced Options
There is an advanced option to customize redirect URLs. When creating or updating a URL redirect, select More options to gain more control over its functionality. You will find the following options.
- Redirect style: specifies the circumstances under which the URL will redirect.
- Permanent (301): redirect the URL of one page to another. For new redirects, this is the default option.
- Temporary (302): redirects one page to another for a limited time. This type of redirect is frequently used to divert visitors during website maintenance or redesign temporarily.
- Proxy: redirects the content of your live page without modifying the URL that the visitor sees in their web browser. This redirect is frequently used to distribute a file hosted in a location separate from your main site.
- Priority: New redirects are assigned the lowest priority by default. Clear the Assign lowest priority checkbox and add a custom value to personalize this setting.
- If there are multiple redirects for the original URL, the one with the lowest priority will be used. For example, if a URL has two URL redirects, one with a priority of 50 and the other with a priority of 1, the redirect with the priority of 1 will be used.
- Match Query Strings: The redirect will fail if there are any additional parameters of the origins URL. Hence, the exact string needs to match. However, this option is not by default. You might change it.
- Ignore trailing slash: use the redirect whether or whether the original URL has a forward slash / at the end. By default, this option is selected.
- Ignore protocol (HTTP or HTTPS): use the redirect regardless of whether the original URL begins with http:// or https://. By default, this option is selected.
- Disable redirect if a page exists at the redirected URL: the redirect will be used only when the original URL is unpublished. This redirect will not be used if the original URL is still active. By default, this option is not selected.
Note: Explain the reason for creating this URL.
- When you’ve finished editing your redirect’s advanced settings, click Update URL redirect to save your changes.
Manage URL Redirects
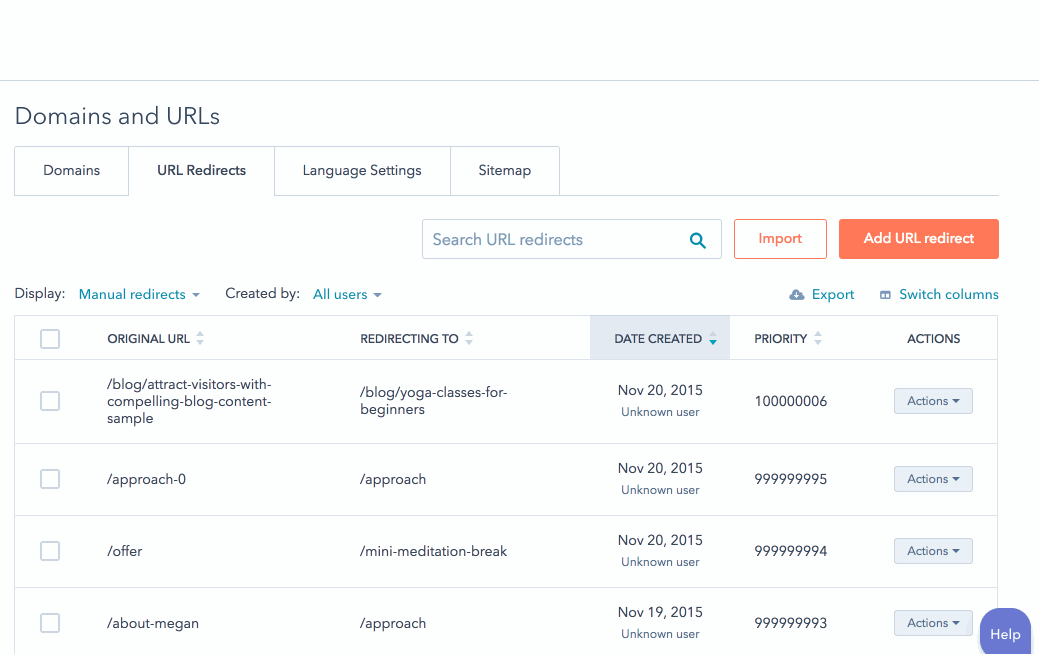
You can search, filter, and sort your URL redirects on the URL Redirects dashboard.
- Click the Display dropdown menu and select an option to filter redirects based on how they were created:
- Manual redirects: Shows redirects that users have created in the URL redirects tool.
- System Redirects: These are generated automatically when the URL of a published blog, page, or blog post is changed. These cannot be changed.
- To view the redirects created by a certain user, pick that user from the Created by dropdown menu.
- To find a specific redirect, enter a URL or part of a URL that exists in the Original URL or Redirect to the field of an existing redirect in the search bar.
- Click Export in the upper right to get all of your URL redirection as a CSV file.
- Click switch columns in the upper right to change the fields that display in your URL redirects dashboard. Check the boxes next to the column choices you want to use. At any given time, only four column options may be selected.
- To edit a URL redirect, pick Edit from the Actions dropdown menu. Alternatively, check the boxes next to the redirects you want to change, then click Edit at the top of the table.
- To erase a URL redirect, hit Delete from the Actions dropdown menu. Alternatively, check the boxes next to the redirects you want to remove, then click Delete at the top of the table.